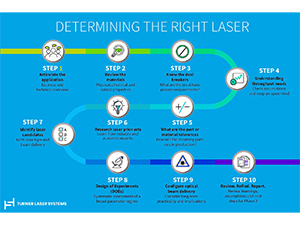
How to Select the Right Laser: 10 Steps to Guide You Through the Process

Author: Mark Turner, PhD, Turner Laser Systems
In the last laser blog, three common mistakes in selecting lasers were explored. This blog covers the 10 steps to finding the right laser with help from a trusted laser partner.
Step 1: Articulate the Application
Communicating your big picture, product vision, and process needs is crucial for your partner. Having them re-articulate what they learned in the form of a document that describes this problem-and-needs statement helps ensure you’ve been understood.
If you’re partner has grasped your needs effectively, it’s time to move on to the next step. Otherwise, discuss it further to identify the misalignment and redo the document until there is good understanding.
Step 2: Review the Materials
Carefully review the materials that need to be processed. Sometimes it’s just a single material. It could be a wafer of glass or semiconductor. Sometimes it’s a complex medical device where there may be five or six different materials that the laser might come in contact with, or a display panel where you have multiple stacks of materials and you might want to process just the top material and the bottom materials or vice versa.
To understand the materials better, it’s important to find out:
- How many materials is the laser going to process?
- What is the proximity of the laser to other materials and the devices?
- What are the wavelengths that these materials are going to absorb or transmit?
- What are the thermal properties of these materials?
- What are the mechanical and chemical properties of these materials?
Step 3: Know the Deal Breakers
By identifying what type of byproducts or features defects are deal breakers, applications engineers will have boundaries to this very large process space.
For example, if you find that any type of slag, burr, micro crack, or similar is a deal breaker, then you may need to work with short pulse lasers as a potential solution, perhaps an ultraviolet laser, or maybe use another laser but only if it does not yield any of deal-breaking defects.
Having these boundaries can help save money. Typically, an absolutely perfect result requires a very expensive and slow solution. Often, the end application can tolerate having some microscopic defects if another process can be two, three, four, sometimes even 10x cheaper as a return on investment. So clear articulation of the deal breakers is important.
Step 4: Understanding Throughput Needs
It’s important to work out throughput requirements and determine why they are set up that way. Challenging these numbers and working out what’s driving throughput requirements can prevent the scenario of misleading statements mistakenly eliminating potential solutions that might be a great fit for your application.
And there’re many ways to scale throughput with lasers systems, from multiple heads, multiple lasers, splitting the beam into multiple focal spots, or just running at a higher power with faster beam delivery systems.
Being mindful that this phase isn’t trying to work out how to make everything fast and perfect is important so to not be discouraged or distracted.
Note: in this early Phase One, the process can be slow. Being mindful that this phase isn’t trying to work out how to make everything fast and perfect is important to avoid being discouraged or distracted. This phase is about identifying the right type of laser and then using it as a platform to get to where you need to be.
The important focus at this stage is to evaluate quality and identify pathways to speeding things up. Having said that, there are some applications where speed is everything, and if you know that it is not financially feasible at a certain speed (one part per minute for example), then it’s good to communicate this early on and have it as one of the deal breakers (Step 3).
Step 5: What Are the Part or Material Tolerances?
Instead of referring to the process tolerances identified early on in Step 1, it’s about tolerances of the material you put into the machine or product you put into machine. In general, most industrial lasers have extremely low variability, which means that the power, size of the laser beam, and key parameters that determine the process are very, very robust.
Most variations in processing are caused by the materials or parts themselves – this can include the flatness of the materials or how well aligned the materials are to certain features.
A lot of processes can show variation(s). In laser drilling, you may drill a bunch of holes in your material and find the exact size of the hole varies quite a lot. This is often caused by the material’s density, flatness, thickness, surface smoothness, or even how debris is being handled.
In laser welding, variations can happen based on how well the material is assembled ahead of time, how well the two parts to be welded together are placed in contact with each other, or the cleanliness of the material and the presence of defects.
So, it’s important to understand what material tolerances are going to be and what these tolerances will be like in a production environment. Sometimes the parts we get at an early stage are produced in a clean environment but handled many times before we receive them, so are a lot dirtier than you would have in production, which can present challenges. Sometimes it’s the opposite: the parts we receive have all been handled in a clean room and are cleaner than what can be expected in production. It’s good to have an understanding what the production environment is going to be like.
Step 6: Research Laser Prior Arts
Steps 1 to Step 5 are guidelines for how to hold theoretical discussions with your laser partner so they have a deeper understanding of your requirements. Once that is established, it’s now a good time to look at what the partner has done in the past.
- Applications they’ve run before
- Consult with their applications engineers
- Research published literature: the laser industry is a strong community of both industrial and academic publications, so much can be learned from the fundamental what is published
It’s also important to avoid drawing conclusions too quickly. This step is as an exercise to mine possibilities and ideas as a starting point. For instance, you may find applications that had drilled 50 micron holes in borosilicate glass, but it’s important to know that you are not necessarily limited to the same features or results. Another example: you may find applications that drill one hole per minute, but there may be other beam delivery or laser systems that can speed things up.
To sum up this step: stay open minded as you learn and focus on understanding the fundamental laser material interaction and compatibility.
Step 7: Identify Laser Candidates
At this stage, you will starting forming a general idea on what types of lasers could be potential candidates for satisfying process requirements (Step 1 to 5) and what beam delivery may be needed.
The choice of the beam delivery and how you use the laser can be the difference between getting an amazing result and having a complete failure. And often the difference between those two can be a choice of lens, the gas pressure that’s used in a gas head, or other subtle process nuances related to part fixtures.
Step 8: Design of Experiments (DOEs)
This is the point now where experiments are running in a lab to test different laser types and setups. One of the most important things to apply here is running experiments that vary the key parameters and look for trends. This is basic scientific methodology: adjusting one variable at a time, and looking at trends when that variables is adjusted. Most laser labs have PhD-level applications engineers and scientists running these applications. But it’s also common that good scientific methodology isn’t used, due to lack of staff or time constraints.
Even though this stage is essentially a simple test, it’s pertinent that DOEs are set up and processes are adjusted in a way such that when you’re comparing these process regimes, you understand the trends and how they came to be. Whether you’re just trying to look at the dependency of laser power, wavelength, beam delivery, or even comparing two completely different types of lasers, you need to analyze the results in a way such that:
- It makes sense
- You’re able to learn about these trends
- You understand how specific parameters are affecting the process
The emphasis in this step is to look for trends using good scientific methodology.
Step 9: Configure Optical Beam Delivery
Make sure that the beam delivery and optics are set up to be in the right regime. It’s important that you have the correct focus conditions to get the result that you require as defined by your process needs.
It’s good in this step to do some calculations. Maybe look into some of the background work that has been done that will help identify the sort of optics conditions you need to work in.
Some applications are a lot more sensitive to this than others. Good examples include glass cutting, glass welding, and applications where focusing conditions are absolutely critical where there isn’t much difference between a working process and a complete failure. There are some applications such as hole drilling, where the size of the focus is going to be critical as well.
Besides working on achieving the process, it’s also helpful to be mindful of practicalities like material handling and flatness from part to part. While you might not be trying to solve these problems in Phase One, you might run into some issues if you come up with a solution in Phase One that relies on a specific optical setup that proves to be impractical in automated production in high volumes.
Step 10: Review, Refine & Report
Now it’s time to take these results and review them together with your laser partner to identify areas where the process can be improved, where it’s satisfactory, and to determine if you found a regime that has the potential to meet your specifications and pass all deal breakers.
This last step is where all lessons learned are compiled into a report used to create an action plan for Phase Two: a phase where we attempt to make the parts to specifications.
Get Started Today
To conclude, determining the right laser, which we call Phase One, is a great opportunity to create a space of solving your application requirements. By avoiding the three common mistakes mentioned in our previous blog, and by approaching Phase One from a methodical scientific approach (the steps in this article) with experts in this space can lead to significantly better results, faster and more cost effective way of achieving overall success.
Please contact us for answers to your questions about laser systems, laser processes, or anything related to laser manufacturing. We’ll be happy to educate, share information, and point you in the right direction.
Contact us to learn more about custom lasers
Article reprinted with permission from our partner Turner Laser Systems
