CASE STUDIES
Machine Vision – Pre & Post Inspection
The Situation
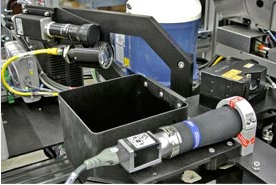
The assembly of a critical module required alignment of the precision components to micron level relative to the reference axis. Achieving this specification required pre-measurement of the parts, vision guided alignment, and post measurement for in process quality control (IPQC).
The Challenge
Achieving micron placement precision relative to the reference axis required careful analysis of tolerance stackup, reference edges, and measurement methodology. The surfaces are difficult to reliably image, requiring specialized illumination design. IPQC is complicated due to alignment references being hidden as assembly sequence progresses.
The Solution
Owens Design collaborated with the product development team to integrate the assembly and alignment process with the necessary measurements. Once the process was defined, Owens designed the camera, lighting systems, part fixturing, and precise staging to achieve the required accuracy and precision. The challenges of imaging the components was solved with a combination of off-axis illumination and techniques that enhanced contrast. The micron level tolerance was met with careful attention to camera system resolution, tolerance analysis, and system calibration. The IPQC measurements were made available to the customer’s operations team for real time feedback and saved to a database for later analysis.

